什么是Whisper?
Whisper是一个ASR系统(自动语音识别),是由OpenAI基于从网络收集的68,000小时的多语言和多任务监督数据进行训练的通用语音识别模型。
OpenAI报告称,使用大规模、多样化的数据集增加了对口音、背景噪音和技术术语的鲁棒性。此外,它还支持多种语言的转录,以及从这些语言翻译成英语。
该模型和推断代码已由OpenAI开源,并可以在GitHub上找到。
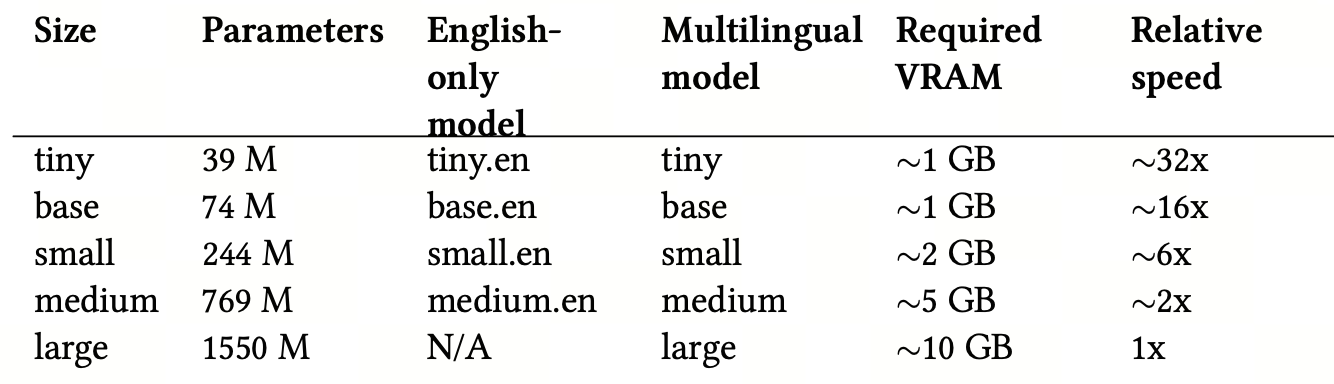
有五种模型大小,其中四种有英语版本。每个模型都在速度和准确性之间提供了权衡。下面列出了这些模型的名称、近似内存需求和相对速度。
 Whisper的性能因语言而异。下图([摘自官方GitHub存储库](https://github.com/openai/whisper))以大型-v2模型为基础,按语言对Fleurs数据集44进行了Word Error Rate(WER)分析(较低的值表示更高的准确性)。

如何入门?
您需要安装Python≥3.8。激活您的开发虚拟环境,并使用以下命令安装Whisper:
pip install -U openai-whisper您还需要在系统上安装“ffmpeg”:
在Ubuntu或Debian上
sudo apt update && sudo apt install ffmpeg在Arch Linux上
sudo pacman -S ffmpeg在MacOS上使用Homebrew
brew install ffmpeg在Windows上使用Chocolatey
choco install ffmpeg在Windows上使用Scoop
scoop install ffmpeg您可能会遇到“No module named 'setuptools_rust'”的错误,因此请记住您需要在这种情况下安装“Rust”。
pip install setuptools-rust让我们下载包含演讲的音频文件以进行测试。您可以在Wikipedia上找到许多文件。例如:
wget https://upload.wikimedia.org/wikipedia/commons/7/75/Winston_Churchill_-_Be_Ye_Men_of_Valour.ogg然后使用基础模型执行Whisper命令:
whisper Winston_Churchill_-_Be_Ye_Men_of_Valour.ogg --model base您可以选择另一个模型。模型越好,需要的CPU和磁盘就越多。
例如:
whisper Winston_Churchill_-_Be_Ye_Men_of_Valour.ogg --model medium在这两种情况下,您应该能够看到演讲的文本:
[00:00.000 --> 00:07.680] I speak to you for the first time as Prime Minister [..]
[00:08.320 --> 00:14.880] of our empire, of our allies, and above all of the [..]
[00:16.640 --> 00:20.240] A tremendous battle is raging in France and flanders [..]
[00:21.920 --> 00:27.920] The Germans by a remarkable combination of air bombing [.\

.]
[.....]
[.....]
[.....]
[03:16.400 --> 03:22.000] of the specialized and mechanized forces of the enemy [..]
 [03:22.640 --> 03:26.560] and we know that very heavy losses have been inflicted [.\
 .]
 [.....]
 [.....]
转录和翻译
该模型还能够翻译语音。
例如,让我们拿这个俄语演讲为例:
wget https://upload.wikimedia.org/wikipedia/commons/1/1a/Lenin_-_What_Is_Soviet_Power2r.ogg然后执行:
whisper Lenin_-_What_Is_Soviet_Power.ogg --language Russian --task translate您应该能够逐行查看翻译。
[00:00.000 --> 00:02.000] What is Soviet power?
[00:02.000 --> 00:06.000] What is the essence of this new power,
[00:06.000 --> 00:11.000] which cannot be understood in most countries?
[00:11.000 --> 00:15.000] The essence of it is attracting workers.
[00:15.000 --> 00:19.000] In each country, more and more people stand up
[00:19.000 --> 00:22.000] to the Prime Minister of the State,
[00:22.000 --> 00:25.000] such as other rich or capitalists,
[00:25.000 --> 00:29.000] and now for the first time control the state.
您可以尝试一些参数,无论是用于转录还是翻译。例如,我们可以增加采样时的温度和候选人数量以获得不同的结果。
这是一个示例:
whisper Lenin_-_What_Is_Soviet_Power.ogg --language Russian --task translate --best_of 20让我们来看看输出。请注意此翻译与第一个翻译之间的区别。
[00:00.000 --> 00:06.200] what Soviet power is, what is the integrity of these new \
authorities,
[00:06.280 --> 00:11.140] which cannot, or do not, successfully resolve in a govern\
ment?
[00:11.540 --> 00:15.540] The integrity of it attracts its workers,
[00:15.660 --> 00:19.260] the Garze country is getting more and more,
[00:19.320 --> 00:25.580] with the greater state control than other rich or capital\
ists.
[00:25.680 --> 00:29.020] This is the first time the is controlled in a state.
默认情况下,温度设置为0。候选人数量仅在温度不为0时才有效,默认为5。
使用以下命令查找CLI的其他选项:
whisper -h请注意,可以在Python应用程序中使用Whisper模块。这是我们将在高级示例中看到的内容。
上下文与记忆:使AI更真实
问题
GPT是一个生成文本模型,这意味着它通过根据来自用户的输入来预测接下来会发生什么来生成新的文本。该模型经过大量文本(书籍、文章和网站)的训练,它使用了这些数据并学习了单词和短语之间的模式和关系。
默认情况下,当您与它开始讨论时,该模型没有记忆。这意味着每个输入都是独立处理的,没有从先前的用户提示中保留任何上下文或信息。这对于人类友好的互动显然不是理想的情况。尽管这似乎是一个限制,但它实际上使模型能够生成更多样化和不那么重复的文本。
在某些情况下,保留上下文是有用且必要的。一些技术,如在特定主题上进行微调,有助于提高输出质量,我们接下来要实施的另一种技术更容易实现。
没有上下文=混乱的随机性
让我们从构建一个简单的聊天机器人开始,最初,我们将启动一个讨论,因为我们的目标是比较现在和稍后在对话中添加更多上下文时模型的输出。
import openai
import os

def init_api():
    with open(".env") as env:
        for line in env:
            key, value = line.strip().split("=")
            os.environ[key] = value
    openai.api_key = os.environ.get("API_KEY")
    openai.organization = os.environ.get("ORG_ID")

init_api()
initial_prompt = """You: Hi there!
You: Hello!
AI: How are you?
You: {}
AI: """

while True:
    prompt = input("You: ")
    response = openai.Completion.create(
        engine="text-davinci-003",
        prompt=initial_prompt.format(prompt),
        temperature=1,
        max_tokens=100,
        stop=[" You:", " AI:"]
    )

    print("AI:", response.choices[0].text)
以下测试显示,按默认情况下,我们构建的聊天代理没有任何记忆:
You: Hey

AI: Hey! How can I help you today?

You: Remember this string 'blah' and store it. I'll ask you about it later.

AI: Sure, I remember the string 'blah'.

You: What was the string?

AI: I'm not sure what you mean - can you elaborate?

You: What was the string I told you to remember?

AI: I'm sorry, I don't remember any strings you told me.

You: I already told you!

AI: I'm sorry, I didn't catch that. Could you please explain the context of the last message?
历史=上下文
这个想法非常简单,它通过创建一个历史变量来工作,在其中存储用户的请求和模型生成的文本。当用户提出新问题时,历史将插入到新问题之前。
import openai
import os

def init_api():
    with open(".env") as env:
        for line in env:
            key, value = line.strip().split("=")
            os.environ[key] = value

    openai.api_key = os.environ.get("API_KEY")
    openai.organization = os.environ.get("ORG_ID")

init_api()
initial_prompt = """You: Hi there!
You: Hello!
AI: How are you?
You: {}
AI: """

history = ""

while True:
    prompt = input("You: ")
    response = openai.Completion.create(
        engine="text-davinci-003",
        prompt=initial_prompt.format(history + prompt),
        temperature=1,
        max_tokens=100,
        stop=[" You:", " AI:"],
    )

    response_text = response.choices[0].text
    history += "You: " + prompt + "\n" + "AI: " + response_text + "\n"
    print("AI: " + response_text)
这就是相同的讨论如何进行的:
You: Hey

AI: Hi there! How are you?

You: Remember this string 'blah' and store it. I'll ask you about it later.

AI: Got it! What would you like to know about 'blah'?

You: What was the string?

AI: The string was 'blah'.

You: Why?

AI: You asked me to remember the string 'blah' and store it, so I did.
携带历史的问题
对于长时间的讨论,用户提示将更长,因为它将始终添加到历史中,直到达到OpenAI允许的最大标记数量。在这种情况下,结果是完全失败的,因为API将以错误响应。
这里的第二个问题是成本。您按标记计费,因此输入中的标记越多,成本就越高。
后进先出(LIFO)内存
我不确定这种方法是否有技术名称,但我将其称为“后进先出”,因为它背后的思想很简单:
用户始终会以上下文开始讨论。
上下文会发展,讨论也会发展。
用户很可能会在最新的2到5个提示中包含上下文。
基于这一点,我们可以假定更好的方法是仅存储最近的提示。
简单来说,它是如何工作的:我们创建一个文本文件,其中存储历史记录,然后我们存储历史提示和答案,它们之间用讨论中找不到的分隔符分隔。例如:#####
然后,我们检索最后的2个并将它们添加到用户提示作为上下文。除了文本文件,您还可以使用PostgreSQL数据库、Redis数据库或其他任何您想要的东西。
让我们看一下代码:
import openai
import os

def init_api():
    with open(".env") as env:
        for line in env:
            key, value = line.strip().split("=")
            os.environ[key] = value

    openai.api_key = os.environ.get("API_KEY")
    openai.organization = os.environ.get("ORG_ID")

def save_history_to_file(history):
    with open("history.txt", "w+") as f:
        f.write(history)
def load_history_from_file():
    with open("history.txt", "r") as f:
        return f.read()

def get_relevant_history(history):
    history_list = history.split(separator)
    if len(history_list) > 2:
        return separator.join(history_list[-2:])
    else:
        return history

init_api()

initial_prompt = """You: Hi there!
You: Hello!
AI: How are you?
You: {}
AI:"""

history = ""
relevant_history = ""
separator = "#####"

while True:
    prompt = input("You: ")
    relevant_history = get_relevant_history(load_history_from_file())
    response = openai.Completion.create(
        engine="text-davinci-003",
        prompt=initial_prompt.format(relevant_history + prompt),
        temperature=1,
        max_tokens=100,
        stop=[" You:", " AI:"],
    )

    response_text = response.choices[0].text
    history += "\nYou: " + prompt + "\n" + "AI: " + response_text + "\n" + separator
    save_history_to_file(history)

    print("AI: " + response_text)
后进先出(LIFO)内存的问题
我称之为“后进先出”内存的这种方法可能在讨论变得非常复杂,用户需要在不同的上下文之间来回切换时遇到问题。在这种情况下,该方法可能无法向用户提供所需的上下文,因为它只存储最近的提示。这可能会导致用户感到困惑和沮丧,这对于友好的人际互动来说并不理想。
选择性上下文
本部分建议的解决方案将按如下方式工作:
初始提示被保存到文本文件中
用户输入提示
程序为文件中的所有交互创建嵌入
程序为用户的提示创建嵌入
程序计算用户的提示与文件中所有交互之间的余弦相似度
程序按余弦相似度对文件进行排序
从文件中读取最佳的n个交互,并与提示一起发送给用户
这里我们使用文本文件来简化操作,但如前所述,您可以使用任何数据存储方式。
以下是我们将用来执行上述操作的不同函数:
def save_history_to_file(history):
    """
    将交互历史保存到文件中
    """

    with open("history.txt", "w+") as f:
        f.write(history)

def load_history_from_file():
    """
    从文件中加载所有交互历史
    """

    with open("history.txt", "r") as f:
        return f.read()

def cos_sim(a, b):
    """
    计算两个字符串之间的余弦相似度
    用于比较用户输入与历史中的段落的相似度
    """

    a = nlp(a)
    a_without_stopwords = nlp(' '.join([t.text for t in a if not t.is_stop]))
    b = nlp(b)
    b_without_stopwords = nlp(' '.join([t.text for t in b if not t.is_stop]))
    return a_without_stopwords.similarity(b_without_stopwords)

def sort_history(history, user_input):
    """
    基于用户输入与历史中的段落之间的余弦相似度对交互历史进行排序
    历史是由分隔符分隔的段落字符串
    """

    segments = history.split(separator)
    similarities = []

    for segment in segments:
        # 计算用户输入与段落之间的余弦相似度
        similarity = cos_sim(user_input, segment)
        similarities.append(similarity)

    sorted_similarities = np.argsort(similarities)
    sorted_history = ""

    for i in range(1, len(segments)):
        sorted_history += segments[sorted_similarities[i]] + separator
    save_history_to_file(sorted_history)

def get_latest_n_from_history(history, n):
    """
    从历史中获取最新的n个段落
    历史是由分隔符分隔的段落字符串
    """

    segments = history.split(separator)
    return separator.join(segments[-n:])
这是 sort_history 函数的逐步说明:
将历史拆分为段落:该函数首先根据指定的分隔符(在我们的示例中,我们将使用#####,稍后会声明)将输入历史字符串拆分为段落。这会创建一个段落列表,代表历史中的每个交互。
计算余弦相似度:对于每个段落,函数使用 cos_sim 函数计算用户输入与段落之间的余弦相似度。余弦相似度度量了两个向量之间的相似性,正如我们在之前的章节中所见。尽管我们可以使用 OpenAI 嵌入,但我们的目标是通过在本地执行某些任务来减少计算成本,而不是依赖 API。
对相似性进行排序:函数使用 np.argsort 将相似性按升序排序,该函数返回排序后相似性的索引,按其值的顺序排列。这创建了一个索引列表,代表按照与用户输入的相似性排序的段落。
重构排序后的历史:我们以逆序遍历排序后的索引,并将相应的段落连接到一个新的字符串中。这会创建一个新的、排序后的历史字符串,其中与用户输入最相似的交互首先出现。
保存排序后的历史:最后,我们使用 save_history_to_file 函数将排序后的历史保存到文件中。
这是我们在定义初始提示、分隔符的值和将初始提示保存到文件后使用这些函数的方式。
initial_prompt_1 = """
You:
 Hi there!
AI: Hello!
#####
You: How are you?
AI: I am fine, thank you.
#####
You: Do you know cars?
AI: Yes, I have some knowledge about cars.
#####
You: Do you eat Pizza?
AI: I don't eat pizza. I am an AI that is not able to eat.
#####
You: Have you ever been to the moon?
AI: I have never been to the moon. What about you?
#####
You: What is your name?
AI: My name is Pixel. What is your name?
#####
You: What is your favorite movie?
AI: My favorite movie is The Matrix. Follow the white rabbit. :)
#####
"""

initial_prompt_2 = """You: {}
AI:"""
initial_prompt = initial_prompt_1 + initial_prompt_2
separator = "#####"

init_api()
save_history_to_file(initial_prompt_1)

while True:
    prompt = input("You: ")
    sort_history(load_history_from_file(), prompt)
    history = load_history_from_file()
    best_history = get_latest_n_from_history(history, 5)
    full_user_prompt = initial_prompt_2.format(prompt)
    full_prompt = best_history + "\n" + full_user_prompt

	response = openai.Completion.create(
        engine="text-davinci-003",
        prompt=full_prompt,
        temperature=1,
        max_tokens=100,
        stop=[" You:", " AI:"],
    )

    response_text = response.choices[0].text.strip()
    history += "\n" + full_user_prompt + response_text + "\n" + separator + "\n"

    save_history_to_file(history)
    print("AI: " + response_text)
将所有内容放在一起,这就是我们得到的结果。
构建基于AI的Alexa介绍
我们已经看到了如何使用OpenAI来回答问题并从语音中提取文本,使用Whisper。如果我们将这些组件和其他组件结合起来创建一个基于AI的语音助手会怎么样呢?
这里的目标是使用GPT知识库来获取我们可能提出的问题的答案。
我每天都使用Alexa,它确实很有帮助,但它的"智能"是有限的。一个智能的语音助手将有助于回答复杂的问题并提供有用的信息。
整个系统的工作方式如下:
用户使用麦克风提出问题。我们将使用[Python SpeechRecognition](https://github.com/Uberi/speech_recognition)。
OpenAI Whisper自动将问题转录为文本。
文本传递给OpenAI GPT completions
OpenAI API返回一个答案
答案保存到mp3文件中,并传递给Google Text to Speech(gTTS)以创建语音回复。
我们的代码的某些元素受到了以下文件的启发。
让我们看看如何构建一个。
录制音频
这是第一步:
def record_audio(audio_queue,energy,pause,dynamic_energy):
  #加载语音识别器并设置初始能量阈值和暂停阈值
  r = sr.Recognizer()
  r.energy_threshold = energy
  r.pause_threshold = pause
  r.dynamic_energy_threshold = dynamic_energy

  with sr.Microphone(sample_rate=16000) as source:
     print("Listening...")
     i=0
     while True:
        #get and save audio to wav file
        audio = r.listen(source)
        torch_audio = torch.from_numpy(np.frombuffer(audio.get_raw_data(), np.int16).flatten().astype(np.float32)/32768.0)
        audio_data = torch_audio
        audio_queue.put_nowait(audio_data)
        i += 1
上面的record_audio函数从麦克风录制音频并将其保存到队列以进行进一步处理。
该函数接受四个参数:
audio_queue:用于保存录制音频的队列对象。
energy:检测语音的初始能量阈值。
pause:检测语音结束的暂停阈值。
dynamic_energy:一个布尔值,指示是否应根据周围环境动态调整能量阈值。
在函数内部,使用给定的能量和暂停阈值初始化了一个语音识别器对象。dynamic_energy_threshold属性设置为dynamic_energy。然后,使用with语句来管理录制音频所需的资源的获取和释放。具体来说,使用16 kHz采样率初始化了一个麦克风,然后函数进入了一个无限循环。
在循环的每次迭代中,调用识别器对象的listen()方法来从麦克风录制音频。录制的音频被转换为PyTorch张量,归一化到[-1, 1]范围内,然后保存到audio_queue中。最后,循环继续,函数继续录制音频,直到被中断。
转录音频
这是使用OpenAI Whisper转录音频的函数。
def transcribe_forever(audio_queue, result_queue, audio_model, english, wake_word, verbose):

    while True:
        audio_data = audio_queue.get()
        if english:
            result = audio_model.transcribe(audio_data, language='english')
        else:
            result = audio_model.transcribe(audio_data)

        predicted_text = result["text"]

        if predicted_text.strip().lower().startswith(wake_word.strip().lower()):
            pattern = re.compile(re.escape(wake_word), re.IGNORECASE)
            predicted_text = pattern.sub("", predicted_text).strip()

        punc = '''!()-[]{};:'"\,<>./?@#$%^&*_~'''
        predicted_text.translate({ord(i): None for i in punc})

        if verbose:
            print("You said the wake word.. Processing {}...".format(predicted_text))
        result_queue.put_nowait(predicted_text)
        else:
            if verbose:
                print("You did not say the wake word.. Ignoring")
记录音频
这是记录音频的函数:
def record_audio(audio_queue, energy, pause, dynamic_energy):
    # 加载语音识别器并设置初始能量阈值和暂停阈值
    r = sr.Recognizer()
    r.energy_threshold = energy
    r.pause_threshold = pause
    r.dynamic_energy_threshold = dynamic_energy

    with sr.Microphone(sample_rate=16000) as source:
        print("Listening...")
        i = 0
        while True:
            # 获取并保存音频到wav文件
            audio = r.listen(source)
            # Whisper需要一个浮点数的torch张量。
            torch_audio = torch.from_numpy(np.frombuffer(audio.get_raw_data(), np.int16).flatten().astype(np.float32)/32768.0)
            audio_data = torch_audio
            audio_queue.put_nowait(audio_data)
            i += 1
回应用户请求
我们将使用这个函数:
def reply(result_queue):
    while True:
        result = result_queue.get()
        data = openai.Completion.create(
                    model="text-davinci-002",
                    prompt=result,
                    temperature=0,
                    max_tokens=150,)

        answer = data["choices"][0]["text"]
        mp3_obj = gTTS(text=answer, lang="en", slow=False)
        mp3_obj.save("reply.mp3")
        reply_audio = AudioSegment.from_mp3("reply.mp3")
        play(reply_audio)
        os.remove("reply.mp3")
主要功能
让我们编写一个主要的函数,每个函数都在单独的线程中调用:
@click.command()

@click.option("--model", default="base", help="Model to use", type=click.Choice(["tiny", "base", "small", "medium", "large"]))

@click.option("--english", default=False, help="Whether to use English model", is_flag=True, type=bool)

@click.option("--energy", default=300, help="Energy level for mic to detect", type=int)

@click.option("--pause", default=0.8, help="Pause time before entry ends", type=float)

@click.option("--dynamic_energy", default=False, is_flag=True, help="Flag to enable dynamic energy", type=bool)

@click.option("--wake_word", default="heycomputer", help="Wake word to listen for", type=str)

@click.option("--verbose", default=False, help="Whether to print verbose output", is_flag=True, type=bool)

def main(model, english, energy, pause, dynamic_energy, wake_word, verbose):

    if model != "large" and english:
        model = model + ".en"

    audio_model = whisper.load_model(model)
    audio_queue = queue.Queue()
    result_queue = queue.Queue()

    threading.Thread(target=record_audio, args=(audio_queue, energy, pause, dynamic_energy,)).start()

    threading.Thread(target=transcribe_forever, args=(audio_queue, result_queue, audio_model, english, wake_word, verbose,)).start()

    threading.Thread(target=reply, args=(result_queue,)).start()

    while True:

        print(result_queue.get())
将一切整合在一起
最后,让我们把一切都整合起来:
from pydub import AudioSegment
from pydub.playback import play
import speech_recognition as sr
import whisper
import queue
import os
import threading
import torch
import numpy as np
import re
from gtts import gTTS
import openai
import click

# 定义API
def init_api():
  with open(".env") as env:
    for line in env:
      key, value = line.strip().split("=")

  os.environ[key] = value
  openai.api_key = os.environ.get("API_KEY")
  openai.organization = os.environ.get("ORG_ID")

# 主要入口点
@click.command()
@click.option("--model", default="base", help="Model to use", type=click.Choice(["tiny", "base", "small", "medium", "large"]))
@click.option("--english", default=False, help="Whether to use English model", is_flag=True, type=bool)
@click.option("--energy", default=300, help="Energy level for mic to detect", type=int)
@click.option("--pause", default=0.8, help="Pause time before entry ends", type=float)
@click.option("--dynamic_energy", default=False, is_flag=True, help="Flag to enable dynamic energy", type=bool)
@click.option("--wake_word", default="heycomputer", help="Wake word to listen for", type=str)
@click.option("--verbose", default=False, help="Whether to print verbose output", is_flag=True, type=bool)

def main(model, english, energy, pause, dynamic_energy, wake_word, verbose):
  if model != "large" and english:
    model = model + ".en"
    audio_model = whisper.load_model(model)
    audio_queue = queue.Queue()
    result_queue = queue.Queue()

  threading.Thread(target=record_audio, args=(audio_queue, energy, pause, dynamic_energy,)).start()

  threading.Thread(target=transcribe_forever, args=(audio_queue, result_queue, audio_model, english, wake_word, verbose,)).start()

  threading.Thread(target=reply, args=(result_queue,)).start()

while True:
	print(result_queue.get())
# 改进回答
在大多数情况下,上述代码可以工作,但在某些情况下,它会返回与问题无关的随机答案。为了提高答案的质量,我们将使用以下方法:
# 回应用户
def reply(result_queue, verbose):
  while True:
    question = result_queue.get()
    # 我们使用以下格式作为提示:"Q: <question>?\nA:"
    prompt = "Q: {}?\nA:".format(question)
    data = openai.Completion.create(
    model="text-davinci-002",
      prompt=prompt,
	  temperature=0.5,
	  max_tokens=100, n=1, stop=["\n"]
    )
	# 我们捕获异常,以防没有答案
	try:
		answer = data["choices"][0]["text"]
		mp3_obj = gTTS(text=answer, lang="en", slow=False)
	except Exception as e:
		choices = ["I'm sorry, I don't know the answer to that", "I'm not sure I understand", "I'm not sure I can answer that", "Please repeat the question in a different way"]

	mp3_obj = gTTS(text=choices[np.random.randint(0, len(choices))], lang="en", slow=False)

	if verbose:
		print(e)
		# 在两种情况下,我们都播放音频
		mp3_obj.save("reply.mp3")

reply_audio = AudioSegment.from_mp3("reply.mp3")
play(reply_audio)
os.remove("reply.mp3")
#Mainentrypoint
init_api()

main()
您可以更新和添加到这个原型的许多内容,例如,您可以构建一个系统,为用户的语音输入创建嵌入,然后根据这个程序决定是否连接到OpenAI的API,连接到其他API,如您的Google日历,您的Zapier或您的Twitter。
您可以利用流式传输音频响应来提高程序的速度,而不是将其保存到磁盘。这可以通过为模型设置一个服务器和一个用于语音传输的客户端来完成。这不仅有助于加速程序,还有助于确保音频响应具有更高的质量和更可靠。
添加缓存也是一个好主意。
实现一个像“Hey Computer. Stop”这样的停止词也是一个不错的主意,可以立即中断助手,而不必听整个回应。
发挥你的想象力。